Knit Meter

Friday, May 31, 2013

Let's Make A Jelly Roll Quilt

This is not a post about how to make a jelly roll race quilt. There are plenty of instructions and videos available; just Google jelly roll race quilt and take your pick. Rather this is a bunch of photos of three women (and one onlooker) who decided to spend some time together and each make a quilt.

I was the only one who actually bought a (or bought an actual) jelly roll. After much deliberation I bought this one from Missouri Star Quilt Co. By coincidence this was also the company where I had first watched how to make a jelly roll race quilt.


My two compadres cut their own 2 inch strips from their own fabric supply. (OK one of them had a nice mother who did it for them.)

I decided to just sew my strips together as they came off the roll as had been suggested in one video. I also joined my strips with a straight seam as suggested in another blog. These two methods made it easy to align strips. Originally I chose the straight join as I liked the look in the one I saw on-line. Also it would have taken me for ever to join the strips on the diagonal. The other two chose strips at random and joined on the diagonal. This meant I "won" the first part of the race.

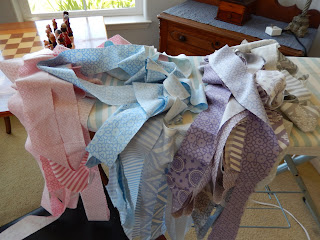
Here are my strips waiting to be sewn together and then after they have been sewn together but before cutting the threads.


Jenny sewing her strips. We knew it was serious when Jenny put her headband on.


After sewing together, I pressed open all my seams and smoothed out the wrinkles in the fabric, folded the strip in half and folded it in my lap to keep it under control while sewing the first seam.

Here it is sitting nicely in my lap and coming off the machine.


Elizabeth wrangling her first long strip all 1600 inches.


And Jenny with hers.


As each seam gets shorter the sewing time should get shorter but I didn't feel that was the case and I soon fell behind. Elizabeth showed Jenny how to wrap the strip around the newel post to ease the folding in half.


Elizabeth won the race.


(She was in a hurry as she had to pick up her children.)

Then Jenny.


And finally me.


And here is our onlooker, Lisa, concentrating on the sock she is knitting.


And the obligatory cat photo.


And now we all want to make another one, except we should finish these completely first. I am going to add borders to mine before backing, binding and quilting as I would like it to be bigger.

The things that I have learned from this first one: I do like the diagonal join but I would need much more time to ensure every strip lined up correctly; joining the strips as they come off the roll produces a nice enough quilt but the colours are spaced too regularly; don't eat a chocolate chip muffin and sew at the same time; you can sew with friends and produce something and have fun.

Monday, May 13, 2013

A Skirt and a Shawl

I have finished two things from the too-many-projects-on-the-go. As the title indicates, a skirt and a shawl. Bad timing for the skirt as it is not wool skirt weather. Oh well. It is finished and I like it.

I started the skirt in January with yarn purchased in 2011. The pattern is Lanesplitter from Knitty.com. I have made this pattern before and although the pattern calls for Noro Kureyon you can use any yarn as basically you are knitting a rectangle (on the bias) to the length and width you require. A new yarn shop opened in Calgary in 2011 and our knitting group had an outing on its opening day. I purchased some Noro Shirakaba in dark pinks.


I knew this would be great for another skirt but it needed another colour to go with it but the store didn't have any other suitable colourways so I bought it, put it in my stash and stayed on the look out for a suitable match. In the end, when Personal Threads had their end of year sale, I bought more Shirakaba in a different colour.


These colours work well together as they tone each other down.

The main thing I wanted to change on the original pattern was the waistband. On the original pattern the waistband is worked in rib with Tahki Cotton Classic, sewn down to the inside of the skirt and elastic inserted. This made a bulky waistline on my skirt. For the second version I worked a stocking stich band with the Shirakaba. This also meant that I did not have to buy a third yarn. After sewing the seam I picked up stitches along one edge, I had worked out my row and stitch gauge and picked up stitches in this ratio, and then knit (I was working in the round) two rows in each colour until the band was the same width as the elastic. I worked a purl row for the fold line and then worked the same number of striped rows. And then came the fun part. Elastic was measured around my waist and the ends sewn together to make a circle, this was held against the waistband and I picked up one stitch from the pick up edge and knit it with the stitch on the needle thus enclosing the elastic. I really should have taken a photo of this process to show how it was done. After the elastic was enclosed, I cast off. The waistband is exactly the same width as the elastic so it will not twist.

Here's a picture of the skirt and a close-up of the waistband. No photos of the skirt being worn yet.


The other project, the shawl, was a quicker knit in terms of start and finish dates. The Yahoo group for Mystery shawls is very quiet but they decided to have a new mystery starting on March 14 - Pi day. Rather than using lace yarn (and I do have some in my stash) I used a sport weight alpaca that had been in my stash for who knows how long. The only thing I can say is that I purchased it in Calgary and there was an original purpose for the yarn which eventually went out the window. I had four balls of the yarn and intended to knit until I had none left so I knew I would not make the full shawl. I ended up with two full sections and half the edging. This is a circular shawl worked on the Pi basis of doubling rows and stitches, I still doubled the stitches before working the edging although I knew this would make the edge ruffled but I like the effect.

After completion, I just did a gentle block. I soaked it and then spread it out to shape. I really like it but once again the photo does not show it being worn.


I forgot to measure it before blocking, but post blocking it is 112cm in diameter.

Saturday, May 11, 2013

Some People Have Firedogs

We have a firecat.

OK it's an excuse for a gratuitous cat picture.


Wednesday, May 8, 2013

Another Project Bag

In my last post I mentioned that I had started a patchwork bag. It is a bigger bag than the first one I made and should be fine for the shawls that I now seem intent on making.

This was a great way to use the larger scraps of fabric I had kept. And I had some actual lining material left over that was ideal for the interior of the bag. I also used interfacing as the lining material is thin. I messed up adding the interfacing but I hope if anyone notices they are kind enough not to say anything.

The bag is made from strips of fabric sewn together with different strips sewn together for the accent piece at the top of the bag which holds the drawstring. The back and front are at right angles to each other and part of me wishes I had used different directions for the accent pieces.